• Home
  • Portfolio
  • contact
  • Press
  • Blog
Menu

DEB NELSON DESIGN

  • Home
  • Portfolio
  • contact
  • Press
  • Blog
×

BEFORE & AFTER: DOUBLE DOORS

Deborah Nelson October 12, 2015

When I purchased my old house, I wanted to add ‘new’ doors at the back of the house from the kitchen. I thought this would add charm to the space and I liked the idea of outdoor access here for carrying in groceries and things ...

Read More
In Before & After, Deb Nelson Design, Design Work, Renovation, The Woodbox Tags adding double doors, before and after doors, deb nelson design doors, deb nelson doors, doors painted black, double doors, old double doors, renovation old doors
door-edit.jpg

TAKE ADVANTAGE OF ORIGINAL FEATURES

Deborah Nelson October 10, 2015

When I bought 'The Woodbox', one of the many features I loved about the house was that it had so much original character and charm intact. The original house was built in 1844, and there have been various additions on the house since then.  Regardless, ...

Read More
In Deb Nelson Design, Inspiration, Renovation, The Woodbox Tags 1844, brass hardware, deb nelson home, deb nelson renovation, deb nelson woodbox, hardware, house built in 1844, old hardware, original features old house, original hardware, the wood box
fireplace-edit-pix1.jpg

BEFORE & AFTER: A FIREPLACE GETS A MAKEOVER

Deborah Nelson September 15, 2014

When I purchased my house I loved the original details – and since the house was built in 1844 there were some beautiful, old, unique features. I especially liked the fireplace in the living room and even though I was starting a renovation, I wanted to keep the fireplace intact as much as I could. Here's how it looked before:

fireplace before

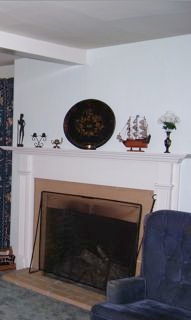
Like any renovation, the list of things to figure out and research was extensive. I felt like I got a fireplace PhD pretty quickly! I had a few obstacles to figure out – and I really wanted to keep a wood burning fireplace. I thought about just leave the whole thing alone. But on the flip side of that, the old chimney had no liner or flue, and the firebox opening on this fireplace was huge. So basically I had a giant opening in the living room and in the winter all of the heat would go up the chimney. But the first summer and fall after the renovation I kept the original fireplace (just painted it) to make my final decision. Here is how it looked then.

fp during

By the fall when the weather was getting cold, the lack of efficiency didn't make any sense, so I started looking at wood burning inserts for the fireplace. There were a few I liked, but of course I wanted something flush that didn't look like wood stove stuck in the fireplace. This also would still mean buying wood, chopping, starting fires every day, etc.

In the end I went to a propane (or gas) insert, the biggest reason was the ease of having it. I realized I would likely have the fireplace on in the morning before work and again for a couple of hours in the evening, it didn't make sense to start up a wood fire only to have to put it out again. The convenience of propane made sense for me – although I miss the smell of a wood burning fire.

The propane insert hunt took some time, I wanted something that looked authentic and I went with one that had double doors on it which I think suited the house. I had to rebuild the hearth and surround to make the insert fit in the wide opening of the firebox and the mantel. It all took some time to figure out and calculate the right proportions (how high to raise the hearth, etc.). In the end I'm happy with the decision and with the look!

fireplace edit pix
In Before & After, Deb Nelson Design, Fireplace, The Woodbox Tags adding an insert, deb nelson fireplace, fireplace, fireplace before and after, fireplace insert, fireplace makeover, fireplace mantel, gas insert fireplace, making an old fireplace energy efficient, old fireplace not efficient, propane insert fireplace, should I add an insert

Categories


Before & After

Living Room

Renovation


INSTAGRAM

Starting to get into the Christmas spirit to be ready for the @ywcahalifax Homes for the Holidays happening November 22-24!  A bit of a natural holiday vibe from my place a few seasons back. This year I'll have it decked a little bit more! 🎄🎄🎄 📷:
Before & After of a much needed little bathroom renovation! The details and gory before pictures (have you ever seen a faucet attached by duct tape?!), are in the link in profile. #debnelsondesign #bathroomrenovation #smallbathroomdesign #beforea
Pretty little detail shot from my Chester sunroom. 📷: @samsonpix  #debnelsondesign #sunroomdecor #shells #showemyourstyled #sodomino #smmakelifebeautiful
A shot of some subtle holiday touches from my Chester place. Now that it's November it's time for me to start thinking holiday decor 🎄to get ready for @ywcahalifax Homes for the Holidays. Just a few weeks away and tickets are on sale now! 📷: @sianc
Lots more of this extensive renovation to show over the coming months!  A quick shot I snapped of my Chester kitchen which has been drastically transformed since the beginning. Swipe over to see the before shot!  #debnelsondesign #kitchenrenovation #
I used a variety of antiques in this guest room - the bed, chair, blanket and artwork were all items I've collected over time.  I love how they add so much character to a room, the antique charcoal sketch above the bed is dated from the 1800’s
Easing you into holiday decorating with one of my favourite past kitchens, featuring a tiny countertop tree and red wool blanket. I’m a big fan of subtle decorations that can make a space feel cozy and festive through the long winter months. My
Open shelving is one of my favourite ways to display those items in your kitchen that are both functional and full of character, like cutting boards, dishes, glassware and even quirky bottle openers 📷: @samsonpix⁣
⁣
#debnelsondesign⁣
#openshelving ⁣

© 2019 DEB NELSON DESIGN