• Home
  • Portfolio
  • contact
  • Press
  • Blog
Menu

DEB NELSON DESIGN

  • Home
  • Portfolio
  • contact
  • Press
  • Blog
×

stairs-edit-pix-2.jpg

PAINTED STAIRS – DIY

Deborah Nelson September 22, 2014
stairs painted white small

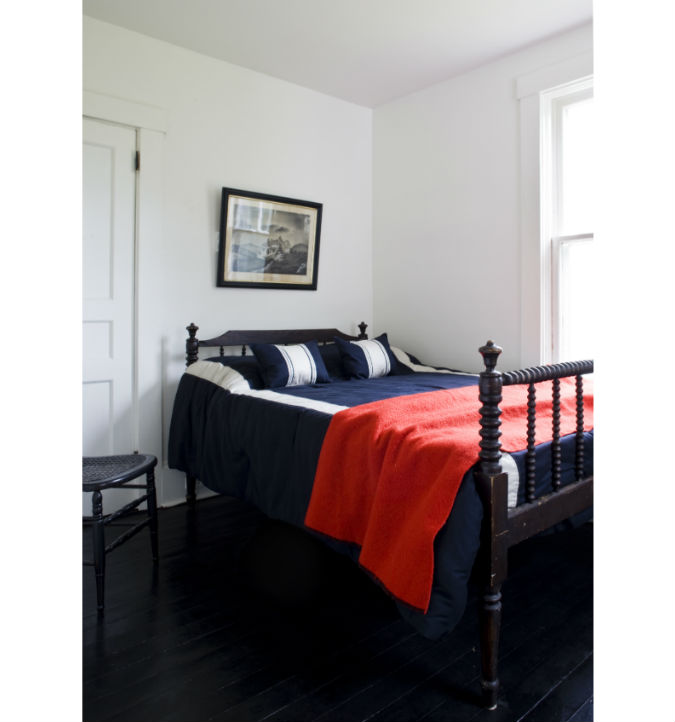
In a few of my own places I've painted stairs, it's a pretty easy DIY and can really transform the look. I've painted a few solid white, meaning I've painted both the riser and tread in white. I've painted some with a black tread and white riser. The colour choice really depends on the house and the look you want to achieve. The above image is my house with white stairs. I've also painted another set of stairs in the house in solid white (behind the chair in this image below). I've used a floor and porch paint on the stairs, and in the past have always used oil but I know it's been discontinued so I'm not sure about the level of durability of the latex floor paint.

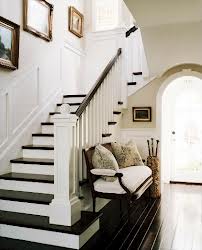
If you prefer the look of a black tread and white riser this is also a pretty simple painting project. But it does involve more prep time, you'll want to tape the sides of the black tread so you don't get black paint on the white riser. It also is a good idea to let everything dry well before you move on to the second colour. Here is the black and white example, I think it's a nice classic look.

images

Another aspect to consider is adding a runner to the stairs. This adds another level of decor and gives you a ton of options for adding colour and pattern.

This is a picture I've had in my inspiration file for years, love how this runner looks on the solid white stairs.

room-shot-Runner-Marakech[1]

If you're adding a runner it's important to consider the amount of stair you want to cover, I prefer a wide runner, leaving just an inch or two exposed on either side of the runner (I find the one above is a bit narrow). You can also add nice details like the metal bar between each stair.

SONY DSC
In Deb Nelson Design, DIY, Inspiration, Stairs Tags can I paint my stairs, deb nelson diy, deb nelson painted stairs, deb nelson runner, deb nelson stairs, DIY painted stairs, DIY stairs, how to paint my stairs, how to paint stairs, paint my own stairs, paint stairs white, painted stairs, painting stairs DIY, runner, runner on stairs, stairs, stairs painted white, white stairs
console-edit-2.jpg

BEFORE & AFTER: CABINET

Deborah Nelson September 18, 2014

Back when I was working on CBC TV doing a regular segment called Deb on a Dime, I was always looking for inexpensive furniture. I'd often go by Value Village and check out the second hand furniture, and this is where I found this cabinet. I wanted to show this makeover because you really can decorate on any budget. Sometimes it means you'll have to get your hands dirty and Do-It-Yourself but you can find some great treasures. The things I always look for are the size and shape of a piece of furniture, everything else can be changed. For this project I needed a narrow cabinet and this one fit the bill. It also provided a pretty good amount of storage inside the unit. I picked it up for $9.99, here it is before:

Console before

It definitely wasn't pretty but I could see the potential. I spray painted it white and I covered the glass doors with frosted vinyl. It didn't take a lot of time, or cost much in materials, to totally transform the cabinet. Here it is after:

console 1
In Before & After, Design Work, DIY, Furniture, Inspiration Tags cabinet makeover, cheap furniture transform, Deb DIY, deb nelson cabinet makeover, deb nelson diy, deb nelson makeover, Deb Nelson on CBC TV, deb on a dime, diy, DIY cabinet, flea market find, Furniture DIY, how to paint a cabinet, paint cabinet white, paint furniture, recycle furniture, skinny cabinet, transform furniture, upcycle furniture
chester_6673-pix-edit.jpg

BEFORE & AFTER: GARAGE MAKEOVER

Deborah Nelson September 4, 2014

I love looking back at this Garage makeover! I worked on this a few years ago and it was such a functional, well used space. When I bought the property I was excited to have a very large 'garage' on the property. Of course I had big plans for the space and thought I could do the work myself. It hadn't been touched in years and the space was actually divided in two: the front was the garage and the back was a room called a 'summer bedroom'. The summer bedroom had potential but needed a lot of work. The fabric on the windows would disintegrate when I touched it. Here is how it looked:

sb1
sb2

And here is a picture of the front garage area:

g1

I decided to remove the wall between the front and back spaces to create one large room. The roof also needed to be replaced and my very handy cousin Mike came to help me do the job (he did the entire roof!) and I worked on getting the inside ripped up.

Mike up on the roof:

pic1

And this was happening inside:

work1

The wall is down!! It made the space so much larger, brighter and open, I loved it.

work2

Mike still on the roof:

work3

And the next phase was the floor; we did a new inexpensive spruce floor which I painted.

work4

And then I spent one entire summer painting this space. The old barn boards on the walls and ceilings just soaked up the paint. It took many coats of primer and white paint. But in the end it was all worth it and I couldn't have done this without Mike! Here it is getting a mention on House & Home magazine.

http://houseandhome.com/design/cottage-garage-renovation

In Before & After, Deb Nelson Design, Design Work, DIY, Inspiration, Renovation Tags before and after garage, deb nelson diy, deb nelson garage, garage before and after, garage inspiration, garage makeover, garage reno, how to fix up a garage, how to make a garage an outdoor living room, how to make a garage usable space, outdoor living room ideas, outdoor space
bed-edit-pix-.jpg

Bedroom makeover: before & after

Deborah Nelson September 2, 2014

This bedroom went through a basic cosmetic makeover- mostly involving paint. I removed the old carpet and found there were original floors underneath that had been painted. I updated those with a new coat of black oil paint and finished the walls, ceiling and trim in white. I added linen roman shades at the windows, but for some reason they aren't up in this shot. Here it is before:

before bed

And the after shot with a spool bed:

bed-edit-pix-.jpg

The image above the bed is currently for sale in Great Village, Nova Scotia. It's an old charcoal sketch signed and dated 1874.

IMG_00001509 s
IMG_1854
IMG_1852
In Artwork, Bedroom, Before & After, Deb Nelson Design, Design Work, DIY, Inspiration Tags affordable bedroom, antique art for sale, antique artwork, antique bed, bedroom before and after, bedroom makeover, bedroom update, cheap bedroom, deb nelson bedroom, deb nelson bedroom makeover, deb nelson design bedroom, how to do a simple bedroom makeover, paint bedroom, paint makeover, painted floors, spool bed, stylish bedroom with paint
lamp-3-edit-pix.jpg

DIY: lamp for $9.99

Deborah Nelson August 21, 2014

This lamp underwent a dramatic transformation and cost less than $10. Back when I was doing a segment on CBC TV called, "Deb on a Dime", I was always looking for affordable and stylish DIY ideas. You can create some great looking lighting if you think outside the box and are willing to get your hands dirty. I picked up a pair of these lamps at a second hand store for $4.99 each. I liked them right away because of the shape and size. I used white primer spray paint to cover the colour and pattern, this gave them a perfect matte white finish. Here I am getting ready to spray:

lamp before

Then I was able to pick up two shades in an 'as is' section of a big box store; each shade was $5.00, for a grand total of $9.99 for each lamp. I think they look pretty good considering the price tag.

Here's how the second lamp looked on the other end of the room.

lamp edit
In Before & After, Deb Nelson Design, Design, Design Work, DIY, Inspiration, Lighting Tags deb nelson before and after, deb nelson cbc makeover, deb nelson diy, deb nelson lamp, deb nelson lamp before and after, deb nelson lamp makeover, deb nelson lighting, deb nelson makeover, deb on a dime, deb on steven and chris on CBC
← NewerOlder →

Categories


Before & After

Living Room

Renovation


INSTAGRAM

Starting to get into the Christmas spirit to be ready for the @ywcahalifax Homes for the Holidays happening November 22-24!  A bit of a natural holiday vibe from my place a few seasons back. This year I'll have it decked a little bit more! 🎄🎄🎄 📷:
Before & After of a much needed little bathroom renovation! The details and gory before pictures (have you ever seen a faucet attached by duct tape?!), are in the link in profile. #debnelsondesign #bathroomrenovation #smallbathroomdesign #beforea
Pretty little detail shot from my Chester sunroom. 📷: @samsonpix  #debnelsondesign #sunroomdecor #shells #showemyourstyled #sodomino #smmakelifebeautiful
A shot of some subtle holiday touches from my Chester place. Now that it's November it's time for me to start thinking holiday decor 🎄to get ready for @ywcahalifax Homes for the Holidays. Just a few weeks away and tickets are on sale now! 📷: @sianc
Lots more of this extensive renovation to show over the coming months!  A quick shot I snapped of my Chester kitchen which has been drastically transformed since the beginning. Swipe over to see the before shot!  #debnelsondesign #kitchenrenovation #
I used a variety of antiques in this guest room - the bed, chair, blanket and artwork were all items I've collected over time.  I love how they add so much character to a room, the antique charcoal sketch above the bed is dated from the 1800’s
Easing you into holiday decorating with one of my favourite past kitchens, featuring a tiny countertop tree and red wool blanket. I’m a big fan of subtle decorations that can make a space feel cozy and festive through the long winter months. My
Open shelving is one of my favourite ways to display those items in your kitchen that are both functional and full of character, like cutting boards, dishes, glassware and even quirky bottle openers 📷: @samsonpix⁣
⁣
#debnelsondesign⁣
#openshelving ⁣

© 2019 DEB NELSON DESIGN