• Home
  • Portfolio
  • contact
  • Press
  • Blog
Menu

DEB NELSON DESIGN

  • Home
  • Portfolio
  • contact
  • Press
  • Blog
×

shop-ext-edit.jpg

FLOOR MODEL SALE AT DEB NELSON DESIGN

Deborah Nelson October 9, 2014

We're currently selling some of our beautiful floor models – here are a few things currently available. Please email info@debnelsondesign.com if you have any questions or would like more information. All of our down-filled, custom made Montauk sofas are on sale at 20% off the regular price, these pieces have been in the show room but have been rarely used, and they are all in gorgeous fabrics. They are Canadian made (in Montreal).

Also we have two other Canadian made chairs by Statum Design on sale at great prices.

If you're interested in seeing these pieces, want more pictures or have any questions, please feel free to get in touch. All the pieces are located on Almon Street in Halifax.

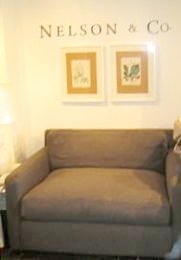
 Montauk Harris sofa: 96" L x 40"D x 24" H – modern linen (tweed grey) with black leather inlay $7240 regular price on sale for $5792 + 15% HST

harris sofa

Montauk Julian sofa: 102" L x 42" D x 30" H – charcoal linen fabric $7800 regular price on sale for $6240 + 15% HST

julian sofa

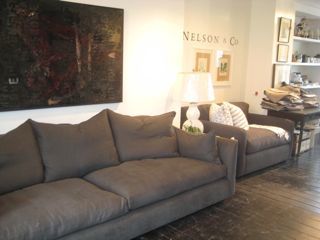
Montauk Geoffrey chair: 50" L x 40" D x 29" H – cashmere grey wool $3540 regular price on sale for $2832 + 15% HST (this is really a large size chair, more like a chair and a half)

geoffrey chair

Montauk Francis chair: 31" L x 31" D x 38" H – light brown leather $5900 regular price on sale for $4720 + 15% HST

francis chair

Statum Design, Eden chair: 31" L x 36" D x 35" H; Grey fabric regular price $925, sale price: $740 + 15% HST

eden chair

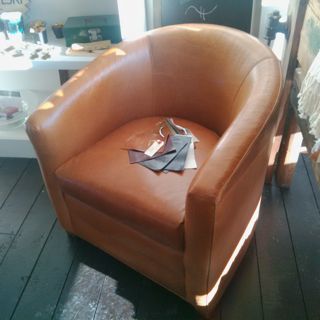
Statum Design, Catherine chair: Light brown (spice) leather tub chair: 28" L x 26" D x 29" H; regular price $1250 sale price $1000 + 15% HST

catherine chair
In Deb Nelson Design, Furniture, Nelson & Co-, News Tags chairs, deb nelson design, Deb Nelson Design halifax, Deb Nelson design sale, Deb Nelson furniture, Deb Nelson Halifax, floor model sale, furniture, furniture on sale, items on sale at Nelson and co-, montauk, Nelson & Co-, Nelson and Co, Nelson and Co sale, sofa
roman-shade-edit-pix.jpg

ROMAN SHADES

Deborah Nelson September 30, 2014
Deb Nelson dining room smaller

I really like roman shades as a window treatment, and I prefer a simple, tailored style. In my own house I have all the windows covered in roman shades, and all of mine are in linen fabric. I like them in the house because when they're fully open they show off a lot of the window detail and let in a lot of light. But they also are easy to open and close for privacy or light control. The living room and dining room have a vertical band of accent fabric on the sides. Like this:

The kitchen is solid, natural coloured linen like these on the windows on either side of the range:

deb nelson design kitchen 2

And upstairs on the third floor I have white shades, all mounted above the windows. I wanted white here so it would blend in with the room and be a very subtle look.  Like this:

IMG_0837 sm

Many people ask about the shades in this house – they are all custom made with lined, solid linen.

In Deb Nelson Design, Design Work, Inspiration, Window treatment, windows Tags custom made linen shade, custom made roman shade, custom made window treatment, deb nelson design, deb nelson roman shades, deb nelson shades, deb nelson window covering, deb nelson windows, linen roman shade, linen shade, linen shades, roman shade, shade, what type of window treatment should I use, window covering, window coverings for an old house, window treatment, window treatments
stairs-edit-pix-2.jpg

PAINTED STAIRS – DIY

Deborah Nelson September 22, 2014
stairs painted white small

In a few of my own places I've painted stairs, it's a pretty easy DIY and can really transform the look. I've painted a few solid white, meaning I've painted both the riser and tread in white. I've painted some with a black tread and white riser. The colour choice really depends on the house and the look you want to achieve. The above image is my house with white stairs. I've also painted another set of stairs in the house in solid white (behind the chair in this image below). I've used a floor and porch paint on the stairs, and in the past have always used oil but I know it's been discontinued so I'm not sure about the level of durability of the latex floor paint.

If you prefer the look of a black tread and white riser this is also a pretty simple painting project. But it does involve more prep time, you'll want to tape the sides of the black tread so you don't get black paint on the white riser. It also is a good idea to let everything dry well before you move on to the second colour. Here is the black and white example, I think it's a nice classic look.

images

Another aspect to consider is adding a runner to the stairs. This adds another level of decor and gives you a ton of options for adding colour and pattern.

This is a picture I've had in my inspiration file for years, love how this runner looks on the solid white stairs.

room-shot-Runner-Marakech[1]

If you're adding a runner it's important to consider the amount of stair you want to cover, I prefer a wide runner, leaving just an inch or two exposed on either side of the runner (I find the one above is a bit narrow). You can also add nice details like the metal bar between each stair.

SONY DSC
In Deb Nelson Design, DIY, Inspiration, Stairs Tags can I paint my stairs, deb nelson diy, deb nelson painted stairs, deb nelson runner, deb nelson stairs, DIY painted stairs, DIY stairs, how to paint my stairs, how to paint stairs, paint my own stairs, paint stairs white, painted stairs, painting stairs DIY, runner, runner on stairs, stairs, stairs painted white, white stairs
fireplace-edit-pix1.jpg

BEFORE & AFTER: A FIREPLACE GETS A MAKEOVER

Deborah Nelson September 15, 2014

When I purchased my house I loved the original details – and since the house was built in 1844 there were some beautiful, old, unique features. I especially liked the fireplace in the living room and even though I was starting a renovation, I wanted to keep the fireplace intact as much as I could. Here's how it looked before:

fireplace before

Like any renovation, the list of things to figure out and research was extensive. I felt like I got a fireplace PhD pretty quickly! I had a few obstacles to figure out – and I really wanted to keep a wood burning fireplace. I thought about just leave the whole thing alone. But on the flip side of that, the old chimney had no liner or flue, and the firebox opening on this fireplace was huge. So basically I had a giant opening in the living room and in the winter all of the heat would go up the chimney. But the first summer and fall after the renovation I kept the original fireplace (just painted it) to make my final decision. Here is how it looked then.

fp during

By the fall when the weather was getting cold, the lack of efficiency didn't make any sense, so I started looking at wood burning inserts for the fireplace. There were a few I liked, but of course I wanted something flush that didn't look like wood stove stuck in the fireplace. This also would still mean buying wood, chopping, starting fires every day, etc.

In the end I went to a propane (or gas) insert, the biggest reason was the ease of having it. I realized I would likely have the fireplace on in the morning before work and again for a couple of hours in the evening, it didn't make sense to start up a wood fire only to have to put it out again. The convenience of propane made sense for me – although I miss the smell of a wood burning fire.

The propane insert hunt took some time, I wanted something that looked authentic and I went with one that had double doors on it which I think suited the house. I had to rebuild the hearth and surround to make the insert fit in the wide opening of the firebox and the mantel. It all took some time to figure out and calculate the right proportions (how high to raise the hearth, etc.). In the end I'm happy with the decision and with the look!

fireplace edit pix
In Before & After, Deb Nelson Design, Fireplace, The Woodbox Tags adding an insert, deb nelson fireplace, fireplace, fireplace before and after, fireplace insert, fireplace makeover, fireplace mantel, gas insert fireplace, making an old fireplace energy efficient, old fireplace not efficient, propane insert fireplace, should I add an insert
office-edit-pix.jpg

BEFORE & AFTER: OFFICE MAKEOVER

Deborah Nelson September 10, 2014

A few years back I did an office makeover for House & Home magazine. The homeowner worked from home and desperately wanted a new office that was organized, had storage solutions and looked stylish. The room had nice high ceilings, but was so empty it actually echoed! I knew it needed to have drapery and a rug to help with the sound. Here is the room before:

office before

I also wanted to add some colour to the room, so I went with a soft green grass cloth on the walls. I added a new desk and vintage chair (I love this desk chair), and bookcases behind that. I added a large white credenza for storage and made a burlap covered cork board above this. In the opposite corner there was room for a comfortable chair for her office guests.

For people that work from home having a nice home office to go into every day can make you feel more organized and hopefully more productive!

Here are more 'after' pictures from House & Home magazine. All 'after' photos by Donna Griffith.

office p3
office p4
office p2
office edit pix
In Before & After, Deb Nelson Design, Inspiration, Office Tags deb nelson before and after, deb nelson makeover, deb nelson office, grass cloth on walls, grassscloth, green grasscloth, home office inspiration, home office stylish, home office update, how to make my home office look better, how to use grasscloth, office makeover, white desk in office
← NewerOlder →

Categories


Before & After

Living Room

Renovation


INSTAGRAM

Starting to get into the Christmas spirit to be ready for the @ywcahalifax Homes for the Holidays happening November 22-24!  A bit of a natural holiday vibe from my place a few seasons back. This year I'll have it decked a little bit more! 🎄🎄🎄 📷:
Before & After of a much needed little bathroom renovation! The details and gory before pictures (have you ever seen a faucet attached by duct tape?!), are in the link in profile. #debnelsondesign #bathroomrenovation #smallbathroomdesign #beforea
Pretty little detail shot from my Chester sunroom. 📷: @samsonpix  #debnelsondesign #sunroomdecor #shells #showemyourstyled #sodomino #smmakelifebeautiful
A shot of some subtle holiday touches from my Chester place. Now that it's November it's time for me to start thinking holiday decor 🎄to get ready for @ywcahalifax Homes for the Holidays. Just a few weeks away and tickets are on sale now! 📷: @sianc
Lots more of this extensive renovation to show over the coming months!  A quick shot I snapped of my Chester kitchen which has been drastically transformed since the beginning. Swipe over to see the before shot!  #debnelsondesign #kitchenrenovation #
I used a variety of antiques in this guest room - the bed, chair, blanket and artwork were all items I've collected over time.  I love how they add so much character to a room, the antique charcoal sketch above the bed is dated from the 1800’s
Easing you into holiday decorating with one of my favourite past kitchens, featuring a tiny countertop tree and red wool blanket. I’m a big fan of subtle decorations that can make a space feel cozy and festive through the long winter months. My
Open shelving is one of my favourite ways to display those items in your kitchen that are both functional and full of character, like cutting boards, dishes, glassware and even quirky bottle openers 📷: @samsonpix⁣
⁣
#debnelsondesign⁣
#openshelving ⁣

© 2019 DEB NELSON DESIGN